Instructors
Depending on the usage and courses, there are three JupyterHub servers running on both in-house infrastructure and Hetzner cloud.
1. Hetzner cloud:
Note
Currently, this server is used for WuS-WS21.
2. In-house server:
Note
Both servers use LDAP as login.
The grading servers have nbgrader, nbassignment and other e2x software to support instructors managing assignments. nbgrader can be used to manage assignments such as creating, releasing, collectiong and grading them. However, we do not force the instructors to use nbgrader exchange. They can use any other tools such as nbgitpuller to release assignments, or LEA to submit the assignments. Nevertheless, we also provide ilias2nbgrader package which can be used to convert LEA submissions to nbgrader format.
Requesting a course
To request a course, we need the following information:
Course |
The name of the course and its course slug. For example name: Robot Perception course slug: RP A complete course identifier for WS 2020 will be RP-WS20 |
Instructors |
List of instructors with FB02UID as username. This also includes students if they are the grader too. |
Students |
List of students with FB02UID as username. |
Resources |
CPU: graders: 4.0 cores (max), students: 2.0 cores (max) RAM can be adjusted but currently we can only offer 2GB maximum for students, and 8GB for graders. The storage is shared but we have a limited capacity. So you should let us know if the course requires a lot of storage. |
Environment |
A generic image is used for all course as explained in here. However, instructors could request own environment if required. |
Additional resources
Graders have access to the following shared directories:
/srv/shares/<course_id>: is shared among the students registered in the course.
Where <course_id> is the course identifier e.g. /srv/shares/RP-SS20. This can be used to store e.g. datasets, assignment images, etc.
/srv/shares/public: is shared with all JupyterHub users e.g. latex_math_editor
Note
Both directories are read-write to graders and read-only to students.
Course profile
Once e2x sys-admins add the requested courses to the hub, the course should be available as a profile. Only the corresponding instructors or graders should be able to see and select the course in the profile list during spawning.
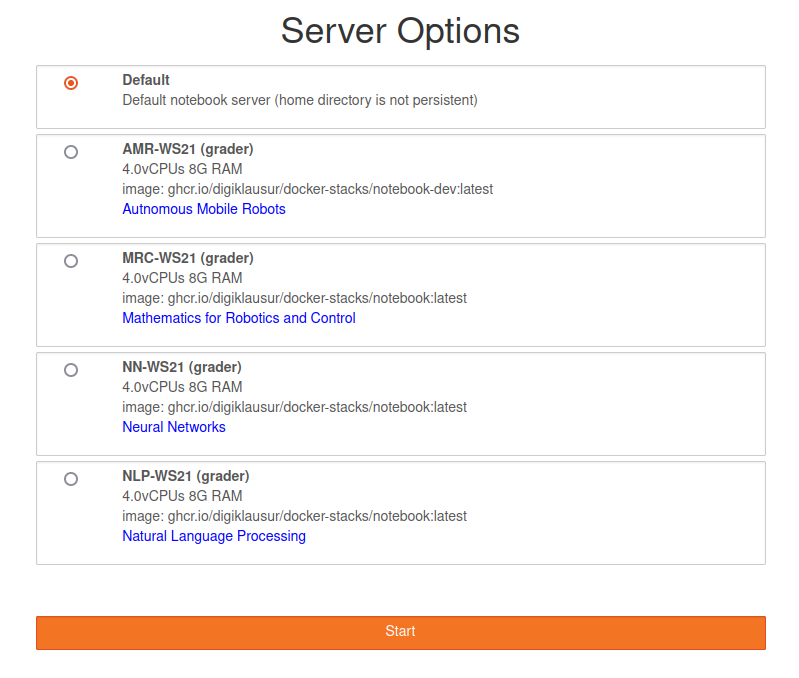
Example of instructor profile list
User management
Unfortunately, graders cannot add students by themselves. You should contact e2x-admin in order to add users.
Course management
Creating a course
The course is automatically created when the server is spawning. It is created according to the requested requirements.
Creating an assignment/exam and making it public
An nbgrader assignment is a directory inside the source directory of a course that contains a Jupyter notebook and any other files required by the assignment (images, data, scripts, and so forth). There are two steps that need to be performed before students can see and download an assignment:
Creating an Assignment
The simplest way to create an assignment directory is to open the Formgrader tab and press “Add new assignment…” at the bottom of the page:

Adding a new assignment
This will open a dialog window that allows us to specify a name and a due date for the assignment:
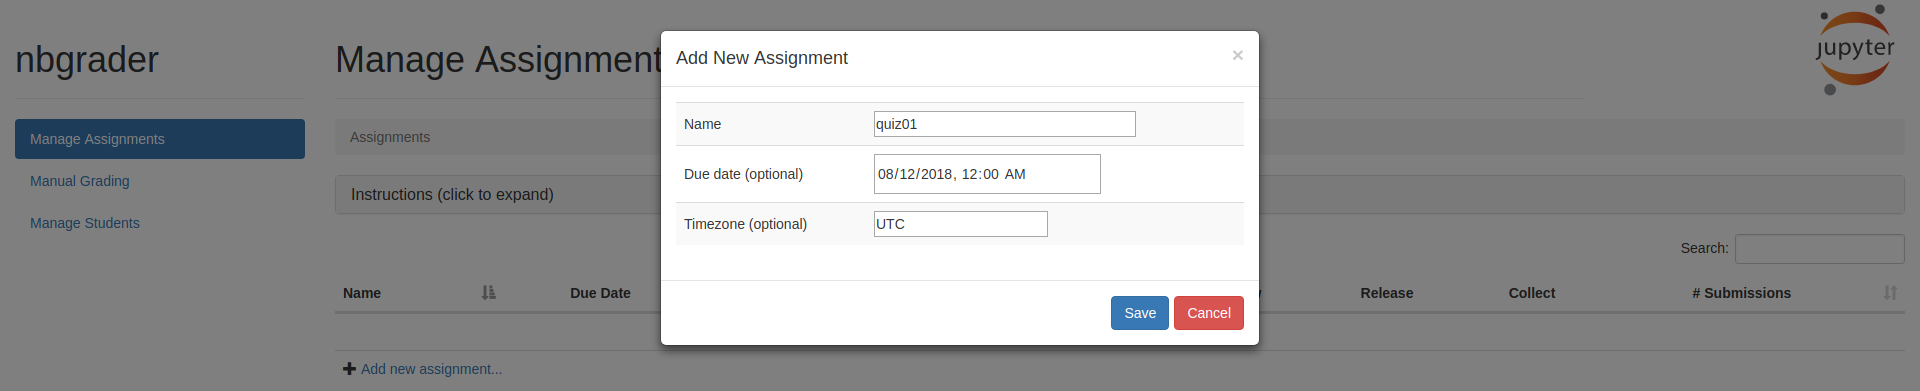
Dialog for creating an assignment
By pressing Save in the dialog window, a directory with the assignment name will be created inside the source directory of the course (in the example from the above figure, the directory will be called quiz01). The assignment will now be visible under the Formgrader tab:

The newly created assignment is now displayed under the Formgrader tab
As shown in the figure above, the newly created assignment has a draft status and is thus not visible to students. In addition, if we explore the directory structure under the Files tab, we can see that the assignment directory is empty:

After creating an assignment, we end up with an empty assignment directory in the course’s source directory
An assignment can be graded through the nbgrader interface only if the notebook contains assignment metadata. To make a Jupyter notebook an assignment notebook, open the notebook and select the Create Assignment option under the View :math:`rightarrow` Cell Toolbar menu.
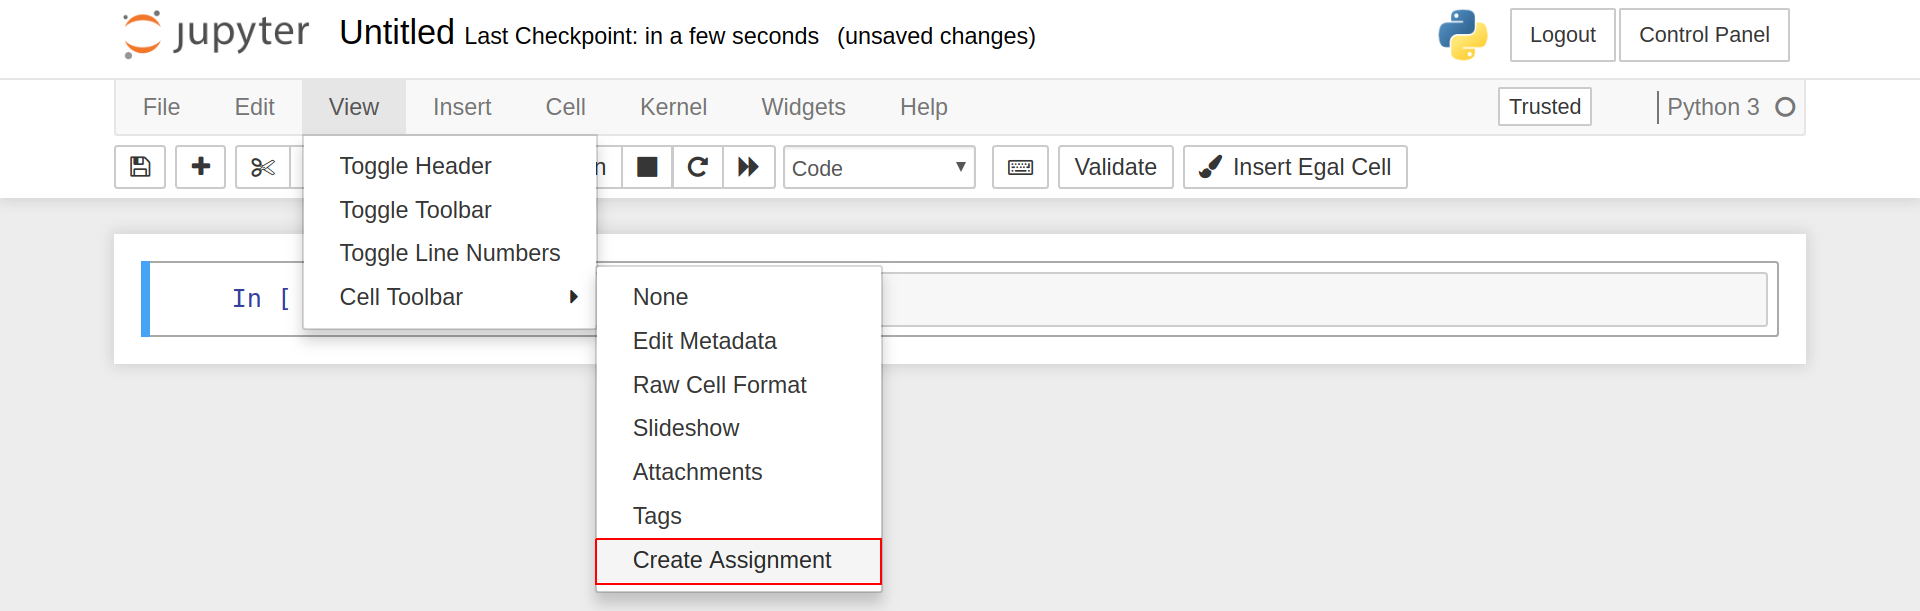
Creating an assignment Jupyter notebook
Once a notebook is converted into an assignment notebook, each cell can be defined as
Manually graded answer [Code/Markdown cell]
Manually graded task [Code/Markdown cell]
Multiple choice [Markdown cell]
Single choice [Markdown cell]
Upload answer [Markdown cell]
Read-only HTML [Markdown cell]
Read-only [Code/Markdown cell]
Autograded answer [Code cell]
Autograded test [Code cell]
these values whether the cells should be autograded or will be graded manually. The folllowing image is an example of e2xgrader cell types:
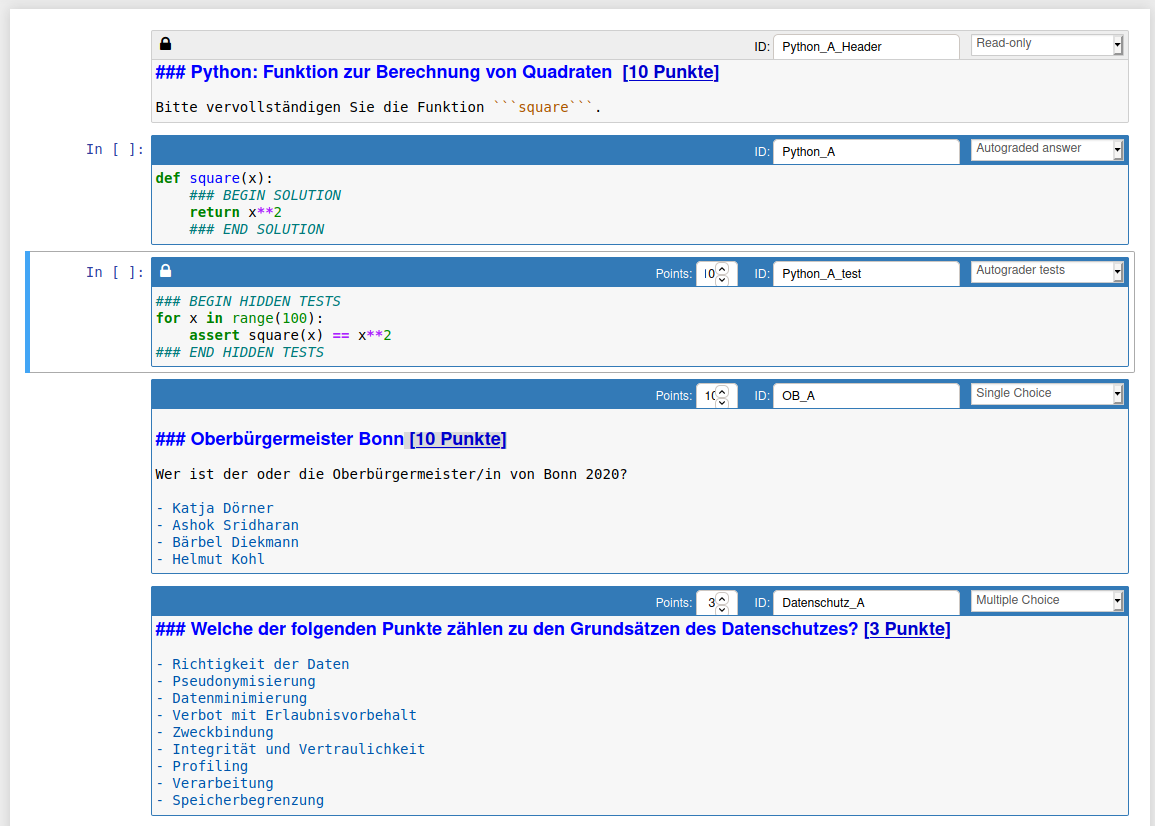
e2xgrader cell types
If you need to upload some files for the assignment, we can upload them to the hub by pressing the Upload button that is just above the directory tree:

Uploading files to the assignment directory
This will open a file browsing dialog where we can select a file to upload. It should be noted that files are not uploaded automatically after we select them in the file browser; we need to instead confirm that we want to upload them by pressing the Upload button next to the file name as shown below:
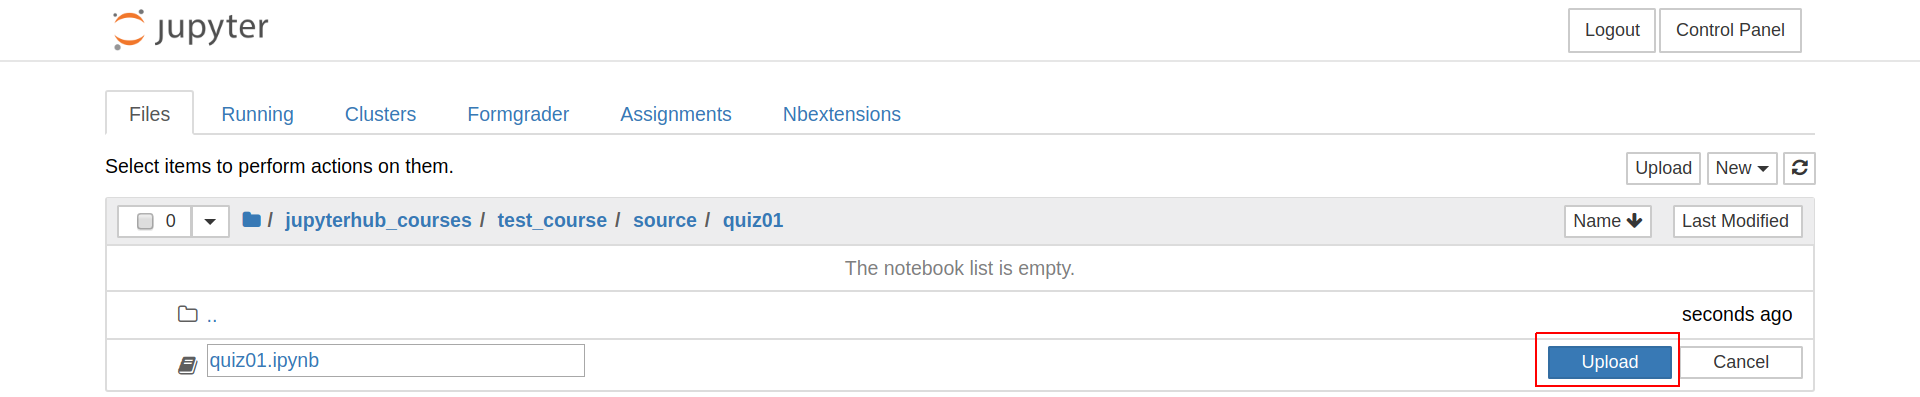
A file upload has to be confirmed before the file is uploaded
The upload can similarly be cancelled if the selected file is incorrect. If we have multiple files that we need to upload, we need to select them one by one and confirm their upload individually; in this case, copying the file to the assignment directory via a command line is a much simpler option.
Hint
Assignments can also be created using nbassignment. But you should enable it via terminal first:
jupyter serverextension enable nbassignment --py --user
jupyter nbextension install nbassignment --py --user --overwrite
jupyter nbextension enable nbassignment --py --user
Making an assignment public
Once an assignment is created and the assignment files are added to the assignment directory, the assignment can be made public so that students can work on it; making an assignment public is called releasing in the nbgrader terminology.
To release an assignment, we need to go back to the Formgrader tab and then press the assignment’s Generate button as shown below:

Generating an assignment
Assignment generation simply copies the assignment contents to a release subdirectory under the course directory (the release subdirectory is created automatically if it does not already exist). An assignment still has the draft status even after generating it, which means that it is still not visible to students. This allows us to preview the assignment contents before releasing it to students (e.g. make sure that the notebook is correctly formatted/displayed and that all necessary files are present in the assignment directory):

Previewing an assignment
Previewing an assignment simply opens the assignment’s directory tree in the release subdirectory:

Generating an assignment copies the assignment directory to the course’s release subdirectory
To finally make the assignment public, we need to press the assignment’s Release button under Formgrader:
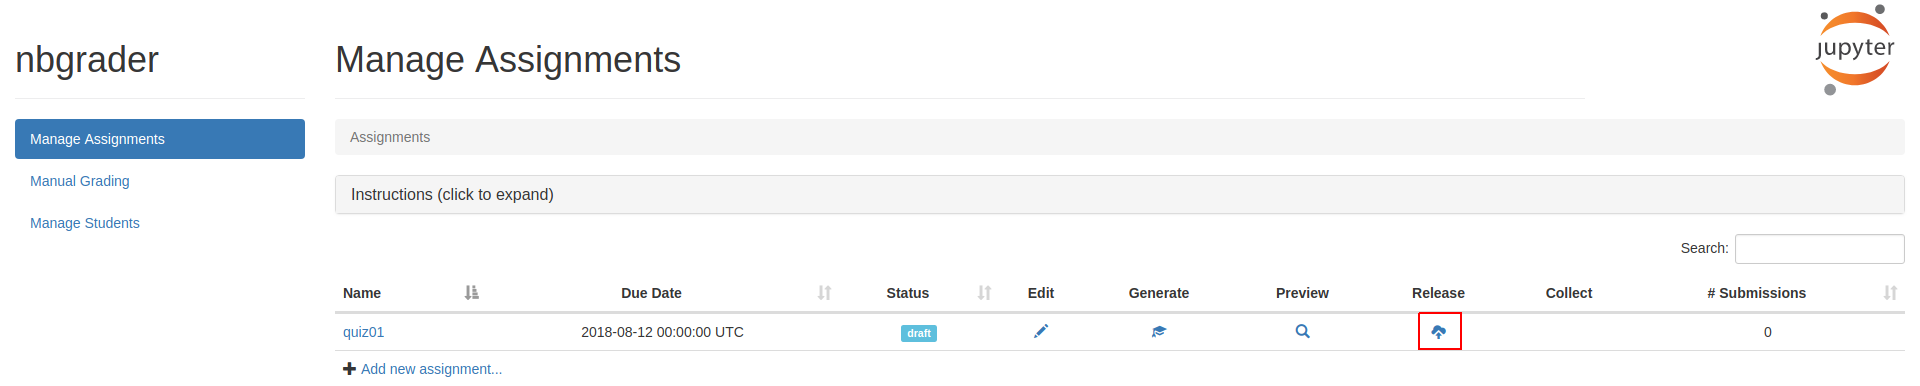
Releasing an assignment makes the assignment visible to students
After releasing an assignment, the assignment gets a released status:

A released assignment gets a released status, which means that it is now visible to students
Once an assignment is released, it becomes visible under the Assignments tab, which means that students can fetch it (i.e. download their own copy of the assignment) and then submit it once they are done working on it:
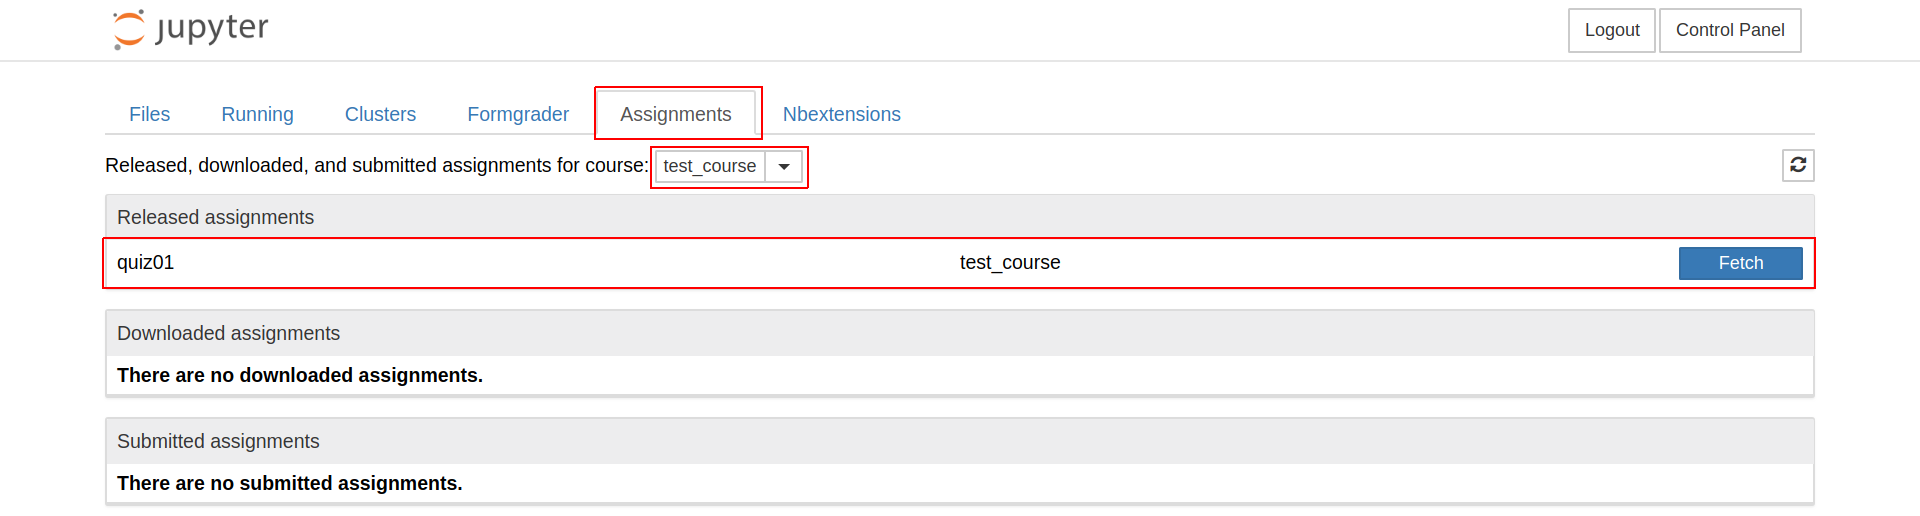
Released assignments are visible under the Assignments tab
Note
There is currently no way of releasing an assignment at some future time; in other words, once an assignment is released, it immediately becomes visible to students. An in-class quiz/assignment should thus be released just before the start of the quiz; otherwise, students will be able to see it in advance.
If we want to make changes to an assignment that has not been released yet (e.g. make modifications to the assignment notebook), we need to make the changes in the assignment directory under the course’s source directory and then generate the assignment again.
Changing an assignment that has already been released and possibly downloaded by students is a bit trickier. In this case, we again have to go through the same procedure of making changes in the assignment directory under source and the generating and releasing the assignment again; in addition to that, students who have already downloaded the assignment will have to delete their local assignment copy (under the Files tab) and then fetch the assignment again.
Grading an assignment
Once students are done working on an assignment, assignments can be graded through the Formgrader tab. In principle, grading assignments with nbgrader is always a two step process: (i) submissions need to be autograded (this runs the assertions in any cells that have been marked for autograding) and (ii) after autograding, the submissions can be manually graded. There are thus a few steps that need to be done for grading an assignment:
Collecting submissions
The submissions can be collected by pressing the assignment’s Collect button:
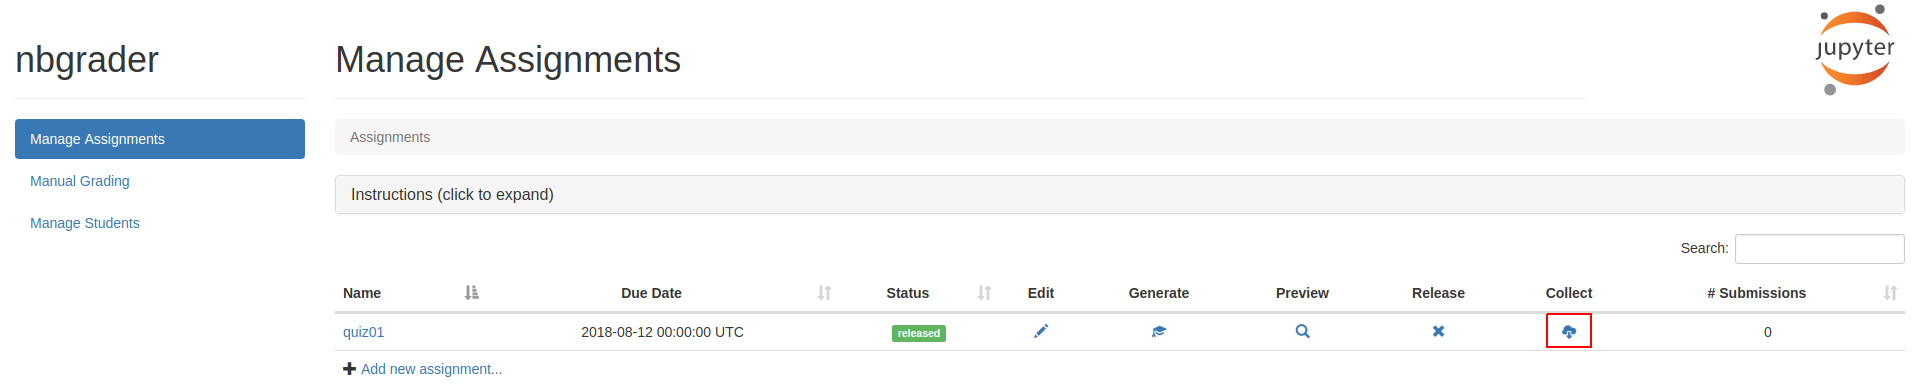
Collecting assignment submissions
Collecting an assignment copies all submissions to a submitted subdirectory in the course’s directory (the submitted directory is created automatically if it does not already exist). The submissions in the submitted directory are organised per student, namely each student gets their own subdirectory and all assignment submissions are copied there:
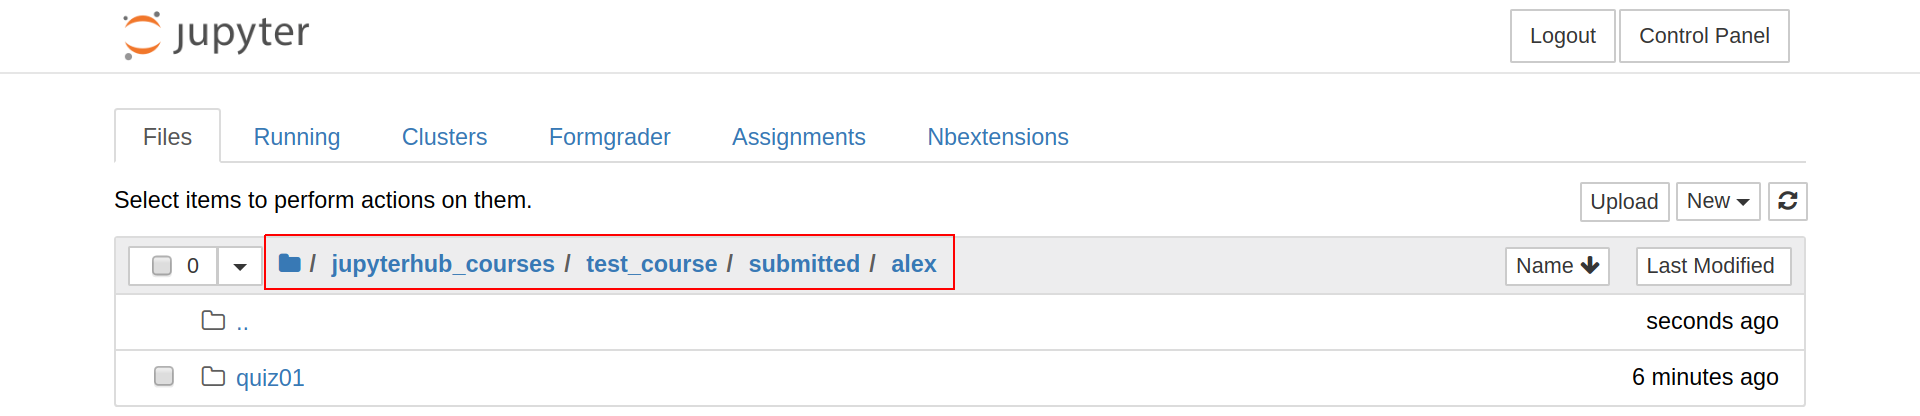
After collection, submitted assignments are copied to a submitted subdirectory under the course’s directory
After collecting student submissions, the number of submissions is displayed as well:

The number of submissions for a particular assignment is appropriately updated after collecting the submissions
In this particular example, we only have a single submission for the quiz01 assignment. To access the submissions for a particular assignment, we need to click on the number of submissions, which then opens the submission view:

Assignment submission view
Autograding submissions
This is seen by the needs autograding status displayed next to each submission. Through the interface, this has to be done for each submission individually and is accomplished by pressing the submission’s Autograde button:

Autograding submissions
If there are a lot of submissions, autograding them through the interface becomes impractical; it is instead considerably convenient to autograde all submissions at once through the command line by running the command
nbgrader autograde <assignment-name>
where <assignment-name> is the name that was given to the assignment during creation (in the running example, that would be quiz01). To open a terminal without ssh-ing into the machine where the hub is hosted, open the following address in a browser:
After autograding, submissions get a needs manual grading status if there are questions that need to be graded manually; otherwise, they get a graded status. Either way, the current score is displayed next to the status:

Autograded submissions are ready to be graded manually
Manual grading
Manual grading can be done in two ways as depicted in the following picture:
e2xgrader formgrader with task view manual grading
Per user manual grading: this will open thw whole tasks in the assignment for each user.
Per task manual grading: this only opens the corresponding task for each user, and when we click next it will take us to the next user with the same task.
We can now access the grading interface via one of the aformentioned options. To do that, we first need to open either Manual Grading or Manual Grading (Task View), then click the assignment name as in the following example
Manual Grading (Per user manual grading):
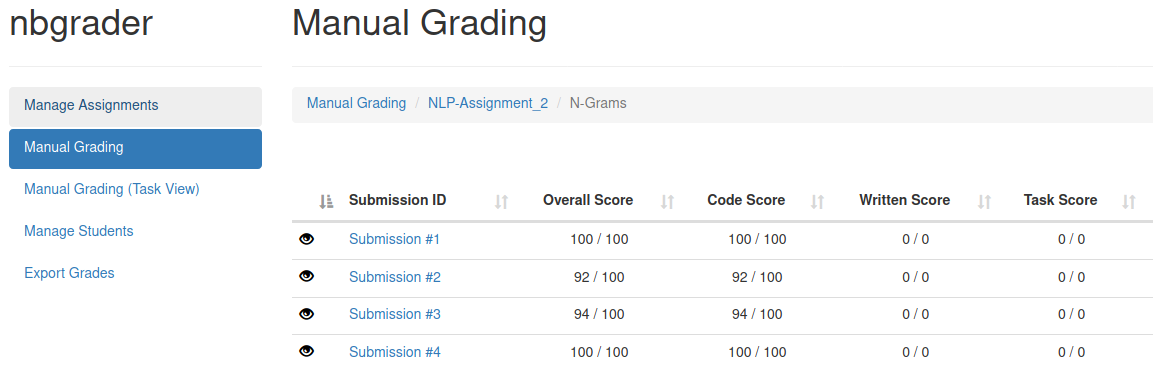
Per user manual grading
Manual Grading (Task View) (Per task manual grading):
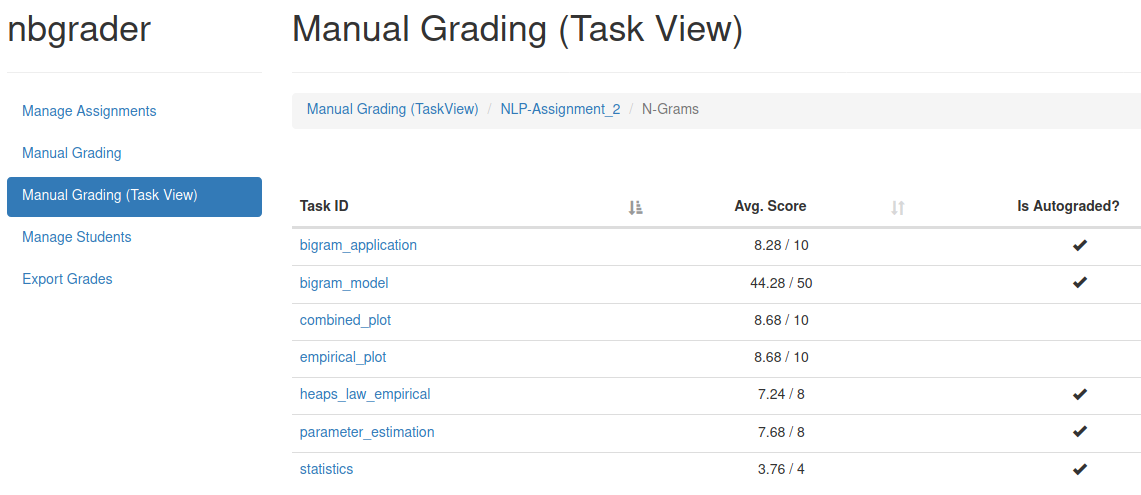
Per task manual grading
We can now open the grading interface by clicking on the Submission#1, which is the username but is hidden, and it can be shown by clicking eye button. The following figure is the example of manual grading interface
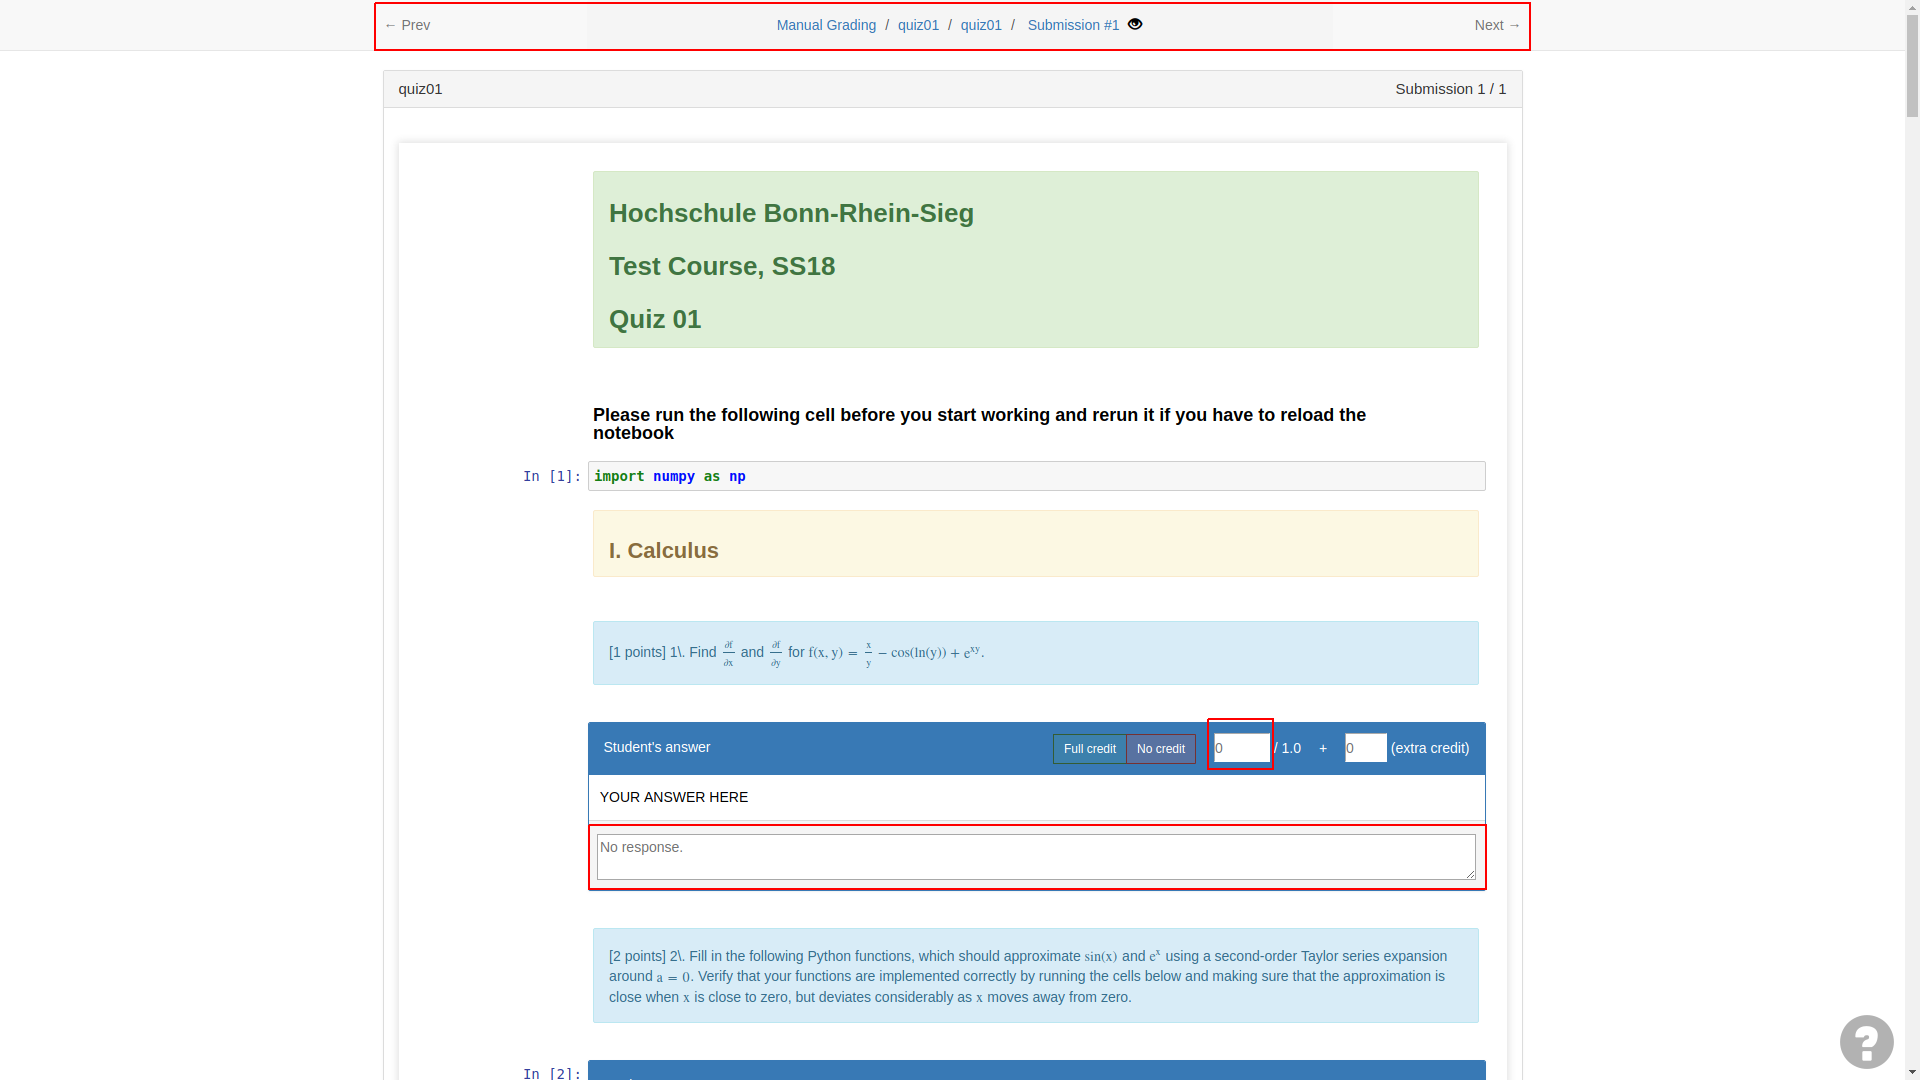
Manual submission grading
In the grading interface, there is a text box below each answer (both under manually graded and under autograded answers). Graders can write their comments in these text boxes and they will then be shown to students as grader feedback.
In addition, graders need to assign the number of points a student has received for a given answer. This number obviuosly cannot be larger that the maximum number of points for the question, but extra credit can also be given for particularly good answers. The grading interface also allows navigating through all submissions so that we do not have to go back and access the grading interface for each student/task individually.
Once an assignment is fully graded, it gets a graded status.
Note
In the grading interface, there is currently no way to insert line comments for more specific feedback; instead, all grader comments have to be written in a single text box below each answer.
Assignment data for a particular course is stored in a gradebook.db database that is created automatically in the course directory.
Since the grading interface only has a single comment box for each answer, graders may want to mark their comments somehow (e.g. by their initials) so that they are distinguishable.
Generating and releasing feedback
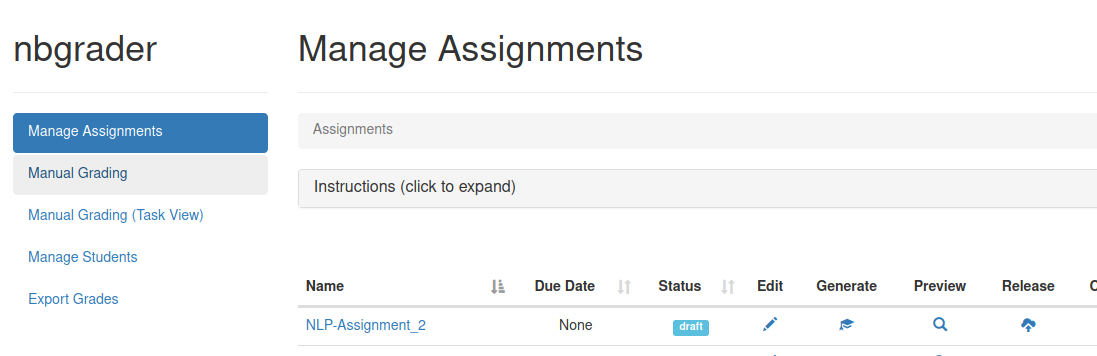
Once an assignment has been graded, we can release feedback to students. Feedback can be generated and released under Manage Assigments tab
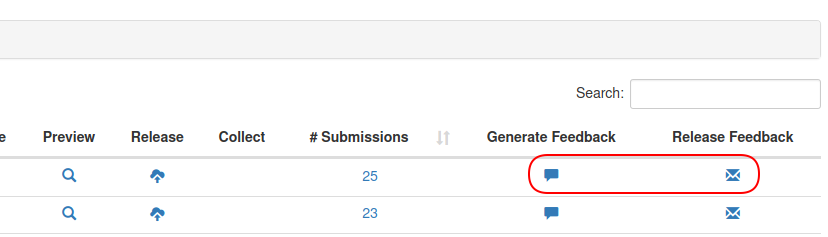
Generate and release feedback
Note
In case there are changes in the grade or comments, graders can regenerate the feedback for each student individually by clicking on the submissions of the corresponding assignment, then regenerate and rerelease the feedback.
Releasing assignment feedback generates html versions of the graded assignment notebooks and copies all feedback files to a feedback subdirectory in the course’s directory. The feedback files in the feedback directory are organised per student, namely each student gets their own subdirectory and the feedback file is copied there:
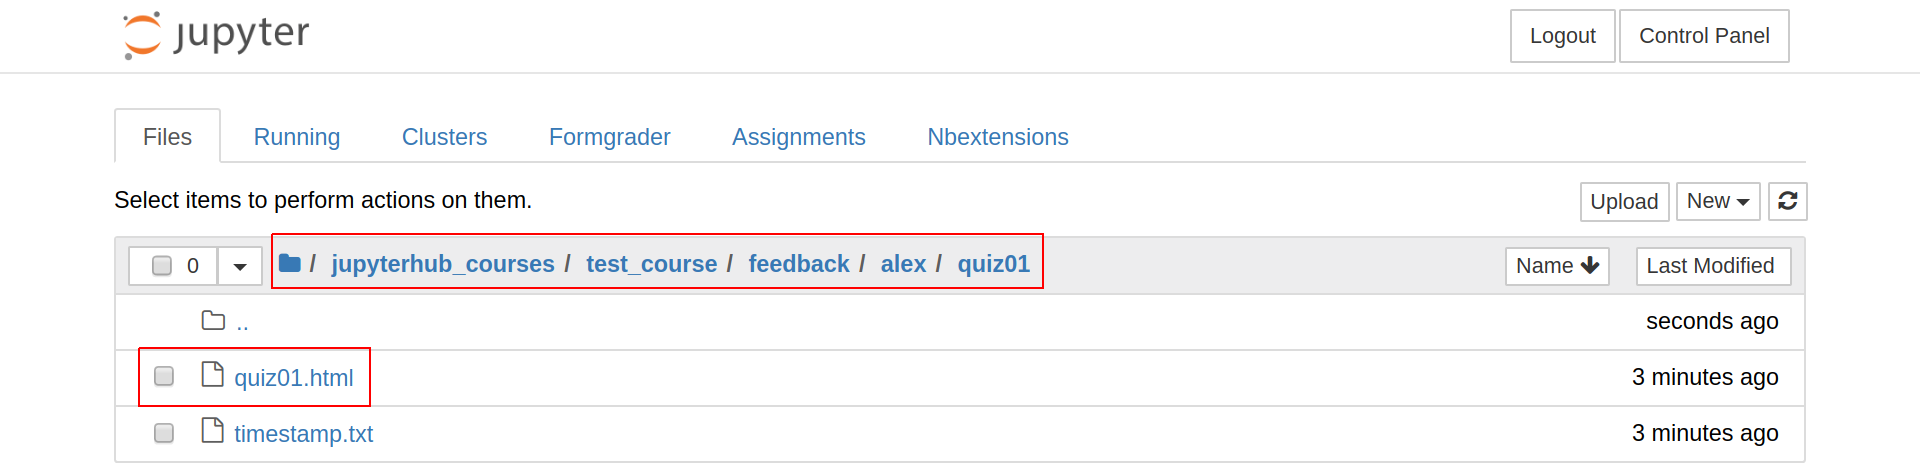
Generated feedback for each student
Exporting grades
You can either export the grades on an assignment level (total score per assignment per student) or on a notebook level (total score per notebook per student) or on a task level (total score per task per student).
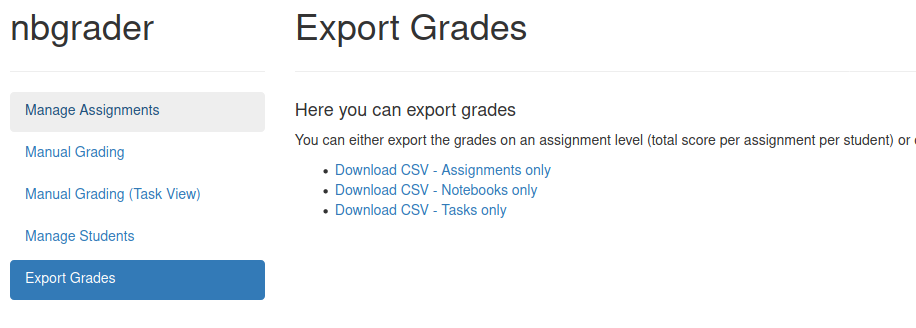
Export grades